Code Quality and Build Settings for iOS Apps
Verifying that the App is Properly Signed
Overview
Code signing your app assures users that it is from a known source and the app hasn’t been modified since it was last signed. Before your app can integrate app services, be installed on a device, or be submitted to the App Store, it must be signed with a certificate issued by Apple. For more information on how to request certificates and code sign your apps, review the App Distribution Guide.
It is possible to retrieve the signing certificate information on the application .app file using codesign. Codesign is used to create, check, and display code signatures, as well as inquire into the dynamic status of signed code in the system.
After obtaining the application .ipa file, rename it to zip and decompress the file. Navigate to the Payload directory and the application .app file will be present.
Execute the following codesign command:
$ codesign -dvvv <yourapp.app>
Executable=/Users/Documents/<yourname>/Payload/<yourname.app>/<yourname>
Identifier=com.example.example
Format=app bundle with Mach-O universal (armv7 arm64)
CodeDirectory v=20200 size=154808 flags=0x0(none) hashes=4830+5 location=embedded
Hash type=sha256 size=32
CandidateCDHash sha1=455758418a5f6a878bb8fdb709ccfca52c0b5b9e
CandidateCDHash sha256=fd44efd7d03fb03563b90037f92b6ffff3270c46
Hash choices=sha1,sha256
CDHash=fd44efd7d03fb03563b90037f92b6ffff3270c46
Signature size=4678
Authority=iPhone Distribution: Example Ltd
Authority=Apple Worldwide Developer Relations Certification Authority
Authority=Apple Root CA
Signed Time=4 Aug 2017, 12:42:52
Info.plist entries=66
TeamIdentifier=8LAMR92KJ8
Sealed Resources version=2 rules=12 files=1410
Internal requirements count=1 size=176
Testing for Debugging Symbols
Overview
As a general rule of thumb, as little explanative information as possible should be provided along with the compiled code. Some metadata such as debugging information, line numbers and descriptive function or method names make the binary or bytecode easier to understand for the reverse engineer, but isn’t actually needed in a release build and can therefore be safely discarded without impacting the functionality of the app.
These symbols can be saved either in "Stabs" format or the DWARF format. When using the Stabs format, debugging symbols, like other symbols, are stored in the regular symbol table. With the DWARF format, debugging symbols are stored in a special "__DWARF" segment within the binary. DWARF debugging symbols can also be saved as a separate debug-information file. In this test case, you verify that no debug symbols are contained in the release binary itself (either in the symbol table, or the __DWARF segment).
Static Analysis
Use gobjdump to inspect the main binary and any included dylibs for Stabs and DWARF symbols.
$ gobjdump --stabs --dwarf TargetApp
In archive MyTargetApp:

armv5te:     file format mach-o-arm


aarch64:     file format mach-o-arm64
Gobjdump is part of binutils and can be installed via Homebrew on Mac OS X.
Dynamic Analysis
Not applicable.
Remediation
Ensure that debugging symbols are stripped when the application is being build for production. Stripping debugging symbols will reduce the size of the binary and increase the difficulty for reverse engineering. To strip debugging symbols, set Strip Debug Symbols During Copy to YES in the build settings of the project.
It is possible to still have a proper Crash Reporter System as it does not require any symbols in the application binary.
Testing for Debugging Code and Verbose Error Logging
Overview
Developers often include debugging code, such as verbose logging statements (using NSLog, println, print, dump, debugPrint) about responses from their APIs, about the progress and/or state of their application in order to speed up verification and get a better understand on errors. Furthermore, there can be debugging code in terms of a "management-functionality" which is used by the developer to set state of the application, mock responses from an API, et cetera. This information can easily be used by the reverse-engineer to track back what is happening with the application. Therefore, the debugging code should be removed from the release version of the application.
Static Analysis
For static analysis, you can take the following approach regarding the logging statements: 1. Import the code of the application into Xcode. 2. Do a search over the code on the following printing functions:NSLog, println, print, dump, debugPrint. 3. When one of them is found, please check whether the developers used a wrapping function around the logging function for better markup of the to be logged statements, start adding that function to your search. 4. For every occurrence found in step 2 and 3, verify whether Macro's or debug-state related guards have been set to turn the logging off in the release build. Please note the change in how objective-C can make use of pre-processor macro's:
#ifdef DEBUG
    // Debug-only code
#endif
Whereas in Swift this has changed: there you need to set either environment-variables in your scheme or as custom flags in the Build settings of a target to make this work. Please note that the following functions, which allow to check on whether the app is build in release-configuration in Swift 2.1, should be recommended against (As Xcode 8 & Swift3 do not support them): _isDebugAssertConfiguration(), _isReleaseAssertConfiguration(), _isFastAssertConfiguration().
Please note that there are more logging functions, depending on the setup of the application, for instance, when CocoaLumberjack is used, then the static analysis is a bit different.
On the "debug-management" code which is built in: inspect the storyboards to see if there are any flows and/or view-controllers that provide different functionality than the ones that should be supported by the application. This can be anything: from debug views, to error-messages printed. From having custom stub-response configurations to logging written to files on the application file system or to a remote-server.
Dynamic Analysis
The dynamic analysis should be executed on both a simulator as well as a device, as we sometimes see that developers use target-based functions (instead of release/debug-mode based functions) to execute the debugging code or not. 1. Run the application on a simulator, check if you can find any output during the execution of the app in the console. 2. Attach a device to your Mac, run the application on the device via Xcode and verify whether you can find any output during the execution of the app in the console.
For the other "manager-based" debug code: click through the application on both a simulator and device and see if you can find any functionality which allows for pre-setting profiles for an app, for selecting the actual server, for selecting possible responses from the API, et cetera.
Remediation
As a developer, it should not be a problem to incorporate debug statements in your debug version of the application as long as you realize that the statements made for debugging should never: - have impact on the actual computational results in such a way that the code should be present in the release version of the application; - end up in the release-configuration of the application.
In Objective-C, developers can use pre-processor macro's to filter out debug code:
#ifdef DEBUG
    // Debug-only code
#endif
In Swift 2, using xCode 7, one has to set custom compiler flags for every target, where the compiler flag has to start with -D. So, when the debug flag -DMSTG-DEBUG is set, you can use the following annotations:
#if MSTG-DEBUG
    // Debug-only code
#endif
In swift 3, using xCode 8, you can set Active Compilation Conditions in Build settings / Swift compiler - Custom flags. Swift3 does not use a pre-processor, but instead makes use of conditional compilation blocks based on the conditions defined:
#if DEBUG_LOGGING
    // Debug-only code
#endif
Testing Exception Handling
Overview
Exceptions can often occur when an application gets into a non-normal or erroneous state. Testing exception handling is about reassuring that the application will handle the exception and get to a safe state without exposing any sensitive information at both the UI and the logging mechanisms used by the application.
However, bear in mind that exception handling in objective-C is quite different than in Swift. Bridging the two concepts to one another in application that has both legacy objective-C code and Swift-code can be problematic.
Exception handling in Objective-C
Objective-C has two types of errors :
NSException
NSException is used for handling programming or low-level errors (e.g. divided by 0, out-of-bounds array access).
An NSException can either be raised by raise() or thrown with @throw, unless caught, will invoke the unhandled exception handler where you can log the statement and then the program will be halted, @catch allows you to recover from it if you are using a @try-@catch-block:
 @try {
     //do work here
 }

@catch (NSException *e) {
    //recover from exception
}

@finally {
     //cleanup
Bear in mind that using NSException comes with pitfalls regarding memory management: you need to cleanup allocations from the try block in the finally block. Note that you can promote NSException objects to NSError by instantiating an NSError at the @catch block.
NSError
NSError is used for all other type of errors. Some APIs of the Cocoa frameworks provide them as an object in their failure callback in case something went wrong, otherwise a pointer to an NSError object is passed by reference. It can be a good practice to provide a BOOL return type to the method that takes a pointer to an NSError object and originally not having a return value a return type (to indicate a success or failure). If there is a return type, then make sure to return nil in case of an error. So in case of NO or nil, you can inspect the error/reason for failure.
Exception handling in Swift
Exception handing in Swift (2~4) is quite different. Even-though there is a try-catch block, it is not there to handle NSException. Instead, it is used to handle errors that conform to the Error (Swift3, ErrorType in Swift2) protocol. This can be challenging when combining Objective-C and Swift code in the same application. Therefore, using NSError is recommended above using NSException in programs with both the languages involved. Furthermore, in Objective-C error-handling is opt-in, but in Swift you have to explicitly handle the throws. For conversion on the error throwing, have a look at the Apple documentation.
Methods that can throw an error use the throws keyword. There are four ways to handle errors in Swift:
- You can propagate the error from a function to the code that calls that function: in this case there is no do-catch, there is only a
throwthrowing the actual error or there is atryto execute the method that throws. The method containing thetrywill need thethrowskeyword as well:
func dosomething(argumentx:TypeX) throws {
    try functionThatThrows(argumentx: argumentx)
}
- Handle the error using a do-catch statement: here you can use the following pattern:
do {
    try functionThatThrows()
    defer {
        //use this as your finally block as with Objective-c
    }
    statements
} catch pattern 1 {
    statements
} catch pattern 2 where condition {
    statements
}
- Handle the error as an optional value:
    let x = try? functionThatThrows()
    //In this case the value of x is nil in case of an error.
- Assert that the error will not occur: by using the
try!expression.
Static Analysis
Review the source code to understand/identify how the application handles various types of errors (IPC communications, remote services invocation, etc). Here are some examples of the checks to be performed at this stage per language.
Static Analysis in Objective-C
Here you can verify that:
- The application uses a well-designed and unified scheme to handle exceptions and errors.
- The exceptions from the Cocoa frameworks are handled correctly.
- The allocated memory in the
@tryblocks are released in the@finallyblocks. - For every
@throwthe calling method has a proper@catchon either the calling method level or at the level of theNSApplication/UIApplicationobjects in order to clean up any sensitive information and possibly try to recover from the issue. - That the application doesn't expose sensitive information while handling errors in its UI or in its log-statements, but are still verbose enough to explain the issue to the user.
- That any confidential information, such as keying material and/or authentication information is always wiped at the
@finallyblocks in case of a high risk application. - That
raise()is only used in rare occasions when termination of the program without any further warning is required. - That
NSErrorobjects do not contain information that might leak any sensitive information.
Static Analysis in Swift
Here you can verify that:
- The application uses a well-designed and unified scheme to handle errors.
- The application doesn't expose sensitive information while handling errors in its UI or in its log-statements, but are still verbose enough to explain the issue to the user.
- That any confidential information, such as keying material and/or authentication information is always wiped at the
deferblocks in case of a high risk application. - That
try!is only used with proper guarding up front, so it is programmatically verified that indeed no error can be thrown by the method that is called usingtry!.
Dynamic Testing
There are various methods for dynamic analysis:
- Provide unexpected values to UI fields in the iOS application.
- Test the custom url-schemes, pasteboard and other inter-app communication controls by providing values that are unexpected or could raise an exception.
- Tamper the network communication and/or the files stored by the application.
- In case of Objective-C, you can use cycript to hook into methods and provide them with arguments that could possibly make the callee throw an exception.
In most cases, the application should not crash, but instead, it should:
- Recover from the error or get into a state in which it can inform the user that it is not able to continue.
- If necessary, inform the user in an informative message to make him/her take appropriate action. The message itself should not leak sensitive information.
- Not provide any information in logging mechanisms used by the application.
Remediation
There are a few things a developer can do:
- Ensure that the application use a well-designed and unified scheme to handle errors.
- Make sure that all logging is removed or guarded as described in the test case "Testing for Debugging Code and Verbose Error Logging".
- For Objective-C, in case of a high-risk application: create your own exception handler which cleans out any secret that should not be easily retrieved. The handler that can be set through
NSSetUncaughtExceptionHandler. - When using Swift, make sure that you do not use
try!unless you have made sure that there really cannot be any error in the method the throwing method that is being called. - When using Swift, make sure that the error does not propagate too far off through intermediate methods.
Verify That Free Security Features Are Activated
Overview
Although XCode set all binary security features by default, it still might be relevant to some old application or to check compilation options misconfiguration. The following features are applicable:
- ARC - Automatic Reference Counting - memory management feature
- adds retain and release messages when required
- Stack Canary - helps preventing buffer overflow attacks
- PIE - Position Independent Executable - enables full ASLR for binary
Static Analysis
XCode Project Settings
- Stack smashing protection
Steps for enabling Stack smashing protection within an iOS application:
- In Xcode, select your target in the "Targets" section, then click the "Build Settings" tab to view its settings.
Verify that "–fstack-protector-all" option is selected under "Other C Flags" section.
PIE support
Steps for building an iOS application as PIE:
- In Xcode, select your target in the "Targets" section, then click the "Build Settings" tab to view its settings.
- For iOS apps, set iOS Deployment Target to iOS 4.3 or later.
- Verify that "Generate Position-Dependent Code" is set at its default value of NO.
Verify that Don't "Create Position Independent Executables" is set at its default value of NO.
ARC protection
Steps for enabling ACR protection within an iOS application:
- In Xcode, select your target in the "Targets" section, then click the "Build Settings" tab to view its settings.
- Verify that "Objective-C Automatic Reference Counting" is set at its default value of YES.
See also the Technical Q&A QA1788 Building a Position Independent Executable.
With otool
Below are examples on how to check for these features. Please note that all of them are enabled in these examples:
- PIE:
$ unzip DamnVulnerableiOSApp.ipa
$ cd Payload/DamnVulnerableIOSApp.app
$ otool -hv DamnVulnerableIOSApp
DamnVulnerableIOSApp (architecture armv7):
Mach header
magic cputype cpusubtype caps filetype ncmds sizeofcmds flags
MH_MAGIC ARM V7 0x00 EXECUTE 38 4292 NOUNDEFS DYLDLINK TWOLEVEL
WEAK_DEFINES BINDS_TO_WEAK PIE
DamnVulnerableIOSApp (architecture arm64):
Mach header
magic cputype cpusubtype caps filetype ncmds sizeofcmds flags
MH_MAGIC_64 ARM64 ALL 0x00 EXECUTE 38 4856 NOUNDEFS DYLDLINK TWOLEVEL
WEAK_DEFINES BINDS_TO_WEAK PIE
- Stack Canary:
$ otool -Iv DamnVulnerableIOSApp | grep stack
0x0046040c 83177 ___stack_chk_fail
0x0046100c 83521 _sigaltstack
0x004fc010 83178 ___stack_chk_guard
0x004fe5c8 83177 ___stack_chk_fail
0x004fe8c8 83521 _sigaltstack
0x00000001004b3fd8 83077 ___stack_chk_fail
0x00000001004b4890 83414 _sigaltstack
0x0000000100590cf0 83078 ___stack_chk_guard
0x00000001005937f8 83077 ___stack_chk_fail
0x0000000100593dc8 83414 _sigaltstack
- Automatic Reference Counting:
$ otool -Iv DamnVulnerableIOSApp | grep release
0x0045b7dc 83156 ___cxa_guard_release
0x0045fd5c 83414 _objc_autorelease
0x0045fd6c 83415 _objc_autoreleasePoolPop
0x0045fd7c 83416 _objc_autoreleasePoolPush
0x0045fd8c 83417 _objc_autoreleaseReturnValue
0x0045ff0c 83441 _objc_release
[SNIP]
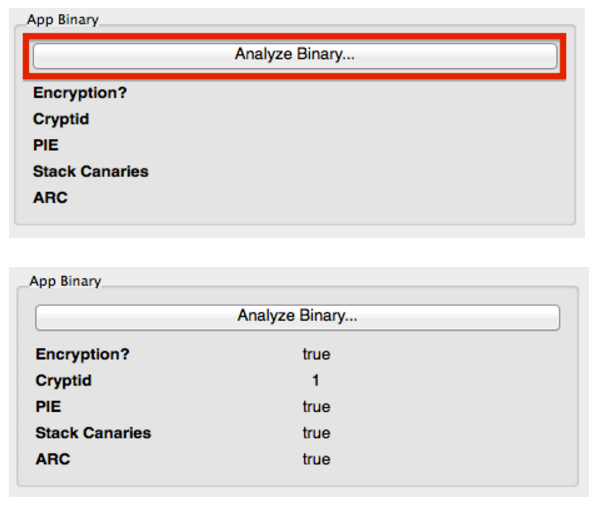
With idb
IDB automates the process of checking for both stack canary and PIE support. Select the target binary in the IDB GUI and click the "Analyze Binary…" button.
References
OWASP Mobile Top 10 2016
- M7 - Client Code Quality - https://www.owasp.org/index.php/Mobile_Top_10_2016-M7-Poor_Code_Quality
OWASP MASVS
- V7.1: "The app is signed and provisioned with valid certificate."
- V7.4: "Debugging code has been removed, and the app does not log verbose errors or debugging messages."
- V7.6: "The app catches and handles possible exceptions."
- V7.7: "Error handling logic in security controls denies access by default."
- V7.9: "Free security features offered by the toolchain, such as byte-code minification, stack protection, PIE support and automatic reference counting, are activated."