iOS Anti-Reversing Defenses
Jailbreak Detection
Overview
In the context of reverse engineering defenses, jailbreak detection mechanisms are added to make it more difficult to run the app on a jailbroken device. This in turn impedes some tools and techniques reverse engineers like to use. As it is the case with most other defenses, jailbreak detection is not a very effective defense on its own, but having some checks sprinkled throughout the app can improve the effectiveness of the overall anti-tampering scheme. A list of typical jailbreak detection techniques on iOS can be found below.
File-based Checks
Checking for the existence of files and directories typically associated with jailbreaks, such as:
/Applications/Cydia.app
/Applications/FakeCarrier.app
/Applications/Icy.app
/Applications/IntelliScreen.app
/Applications/MxTube.app
/Applications/RockApp.app
/Applications/SBSettings.app
/Applications/WinterBoard.app
/Applications/blackra1n.app
/Library/MobileSubstrate/DynamicLibraries/LiveClock.plist
/Library/MobileSubstrate/DynamicLibraries/Veency.plist
/Library/MobileSubstrate/MobileSubstrate.dylib
/System/Library/LaunchDaemons/com.ikey.bbot.plist
/System/Library/LaunchDaemons/com.saurik.Cydia.Startup.plist
/bin/bash
/bin/sh
/etc/apt
/etc/ssh/sshd_config
/private/var/lib/apt
/private/var/lib/cydia
/private/var/mobile/Library/SBSettings/Themes
/private/var/stash
/private/var/tmp/cydia.log
/usr/bin/sshd
/usr/libexec/sftp-server
/usr/libexec/ssh-keysign
/usr/sbin/sshd
/var/cache/apt
/var/lib/apt
/var/lib/cydia
Checking File Permissions
Another possibility would be trying to write into a location outside the application’s sandbox. This can be done by having the application attempt to create a file in, for example, the /private directory. If the file is successfully created, it means the device is jailbroken.'
NSError *error;
NSString *stringToBeWritten = @"This is a test.";
[stringToBeWritten writeToFile:@"/private/jailbreak.txt" atomically:YES
         encoding:NSUTF8StringEncoding error:&error];
if(error==nil){
   //Device is jailbroken
   return YES;
 } else {
   //Device is not jailbroken
   [[NSFileManager defaultManager] removeItemAtPath:@"/private/jailbreak.txt" error:nil];
 }
Checking Protocol Handlers
Attempting to open a Cydia URL. The Cydia app store, which is installed by default by practically every jailbreaking tool, installs the cydia:// protocol handler.
if([[UIApplication sharedApplication] canOpenURL:[NSURL URLWithString:@"cydia://package/com.example.package"]]){
Calling System APIs
Calling the system() function with a NULL argument on a non jailbroken device will return ”0”; doing the same on a jailbroken device will return ”1”. This is since the function will check whether /bin/sh can be accessed, and this is only the case on jailbroken devices.
Bypassing Jailbreak Detection
Once you start the application, which has jailbreak detection enabled on a jailbroken device, you will notice one of the following:
- The application closes immediately without any notification
- There is a popup window indicating that the application won't run on a jailbroken device
In the first case, it's worth checking if the application is fully functional on non-jailbroken device. It might be that the application is in reality crashing or has a bug that causes exiting. This might happen when you're testing a preproduction version of the application.
Let's look on how to bypass jailbreak detection using once again Damn Vulnerable iOS application as an example. After loading the binary into Hopper, you need to wait until the application is fully disassembled (look at the top bar). Then we can look for 'jail' string in the search box. We see two different classes, which are SFAntiPiracy and JailbreakDetectionVC. You might also want to decompile the functions to see what they are doing and especially what they return.
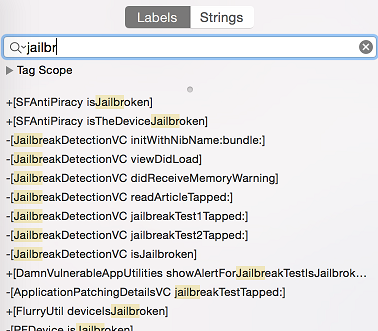
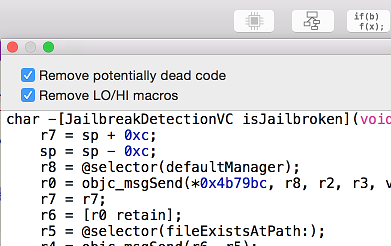
As you can see, there is a class method +[SFAntiPiracy isTheDeviceJailbroken] and instance method -[JailbreakDetectionVC isJailbroken]. The main difference for us is that we can inject cycript and call the class method directly, whereas when it comes to instance method, we must first look for instances of the target class. The function choose will look in the memory heap for known signatures of a given class and return an array of instances that were found. It's important to put an application into a desired state, so that the class is indeed instantiated.
Let's inject cycript into our process (look for your PID with top):
iOS8-jailbreak:~ root# cycript -p 12345
cy# [SFAntiPiracy isTheDeviceJailbroken]
true
As you can see our class method was called directly and returned true. Now, let's call -[JailbreakDetectionVC isJailbroken] instance method. First, we have to call choose function to look for instances of JailbreakDetectionVC class.
cy# a=choose(JailbreakDetectionVC)
[]
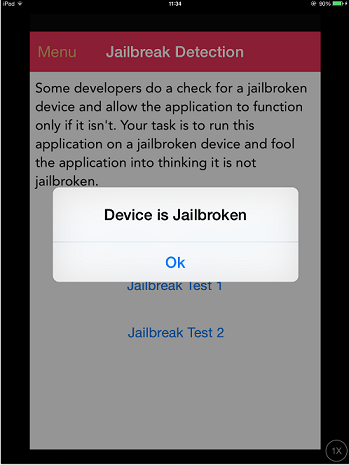
Ooops! The returned array is empty. It means that there are no instances of this class registered within the runtime. In fact, we haven't clicked second 'Jailbreak Test' button, which indeed initializes this class:
cy# a=choose(JailbreakDetectionVC)
[#"<JailbreakDetectionVC: 0x14ee15620>"]
cy# [a[0] isJailbroken]
True
Hence you now understand why it's important to have your application in a desired state. Now bypassing jailbreak detection in this case with cycript is trivial. We can see that the function returns Boolean and we just need to replace the return value. We can do it by replacing the function implementation with cycript. Please note that this will actually replace the function under its given name, so beware of side effects in case if the function modifies anything in the application:
cy# JailbreakDetectionVC.prototype.isJailbroken=function(){return false}
cy# [a[0] isJailbroken]
false
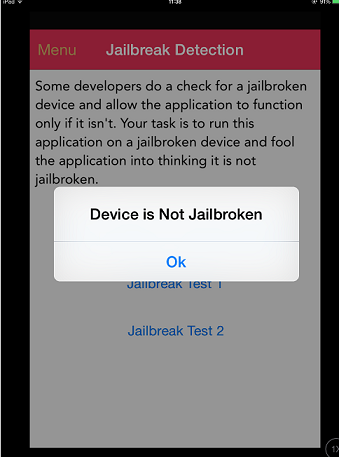 In this case we have bypassed the jailbreak detection of the application!
Now, imagine that the application is closing immediately upon detecting that the device is jailbroken. In this case you have no chance (time) to launch cycript and replace function implementation. Instead, you would have to use CydiaSubstrate, use a proper hooking function, like MSHookMessageEx and compile the tweak. There are good sources on how to perform this, however, we will provide possibly a faster and more flexible approach.
Frida is a dynamic instrumentation framework, which allows you to use among other a JavaScript API to instrument the apps. One feature that we will use in bypassing jailbreak detection is to perform so-called early instrumentation, i.e. replace function implementation on startup.
- First, ensure that
frida-serveris running on your iDevice - iDevice must be connected via USB cable
- Use
frida-traceon your workstation:
$ frida-trace -U -f /Applications/DamnVulnerableIOSApp.app/DamnVulnerableIOSApp -m "-[JailbreakDetectionVC isJailbroken]"
This will actually start DamnVulnerableIOSApp, trace calls to -[JailbreakDetectionVC isJailbroken] and create a JavaScript hook with onEnter and onLeave callback functions. Now it's trivial to replace the return value with value.replace() as shown in the example below:
    onLeave: function (log, retval, state) {
    console.log("Function [JailbreakDetectionVC isJailbroken] originally returned:"+ retval);
    retval.replace(0);
      console.log("Changing the return value to:"+retval);
    }
Running this will have the following result:
$ frida-trace -U -f /Applications/DamnVulnerableIOSApp.app/DamnVulnerableIOSApp  -m "-[JailbreakDetectionVC isJailbroken]:"

Instrumenting functions...                                           `...
-[JailbreakDetectionVC isJailbroken]: Loaded handler at "./__handlers__/__JailbreakDetectionVC_isJailbroken_.js"
Started tracing 1 function. Press Ctrl+C to stop.
Function [JailbreakDetectionVC isJailbroken] originally returned:0x1
Changing the return value to:0x0
           /* TID 0x303 */
  6890 ms  -[JailbreakDetectionVC isJailbroken]
Function [JailbreakDetectionVC isJailbroken] originally returned:0x1
Changing the return value to:0x0
 22475 ms  -[JailbreakDetectionVC isJailbroken]
Please note that there were two calls to -[JailbreakDetectionVC isJailbroken], which corresponds to two physical taps on the app GUI.
Frida is a very powerful and versatile tool. Refer to the documentation to get more details.
-- TODO [a generic Frida script that catches many JB detection methods] --
Python script for hooking Objective-C methods and native functions:
import frida
import sys

try:
    session = frida.get_usb_device().attach("Target Process")
except frida.ProcessNotFoundError:
    print "Failed to attach to the target process. Did you launch the app?"
    sys.exit(0);

script = session.create_script("""

    // Handle fork() based check

  var fork = Module.findExportByName("libsystem_c.dylib", "fork");

    Interceptor.replace(fork, new NativeCallback(function () {
        send("Intercepted call to fork().");
        return -1;
    }, 'int', []));

  var system = Module.findExportByName("libsystem_c.dylib", "system");

    Interceptor.replace(system, new NativeCallback(function () {
        send("Intercepted call to system().");
        return 0;
    }, 'int', []));

    // Intercept checks for Cydia URL handler

    var canOpenURL = ObjC.classes.UIApplication["- canOpenURL:"];

    Interceptor.attach(canOpenURL.implementation, {
        onEnter: function(args) {
          var url = ObjC.Object(args[2]);
          send("[UIApplication canOpenURL:] " + path.toString());
          },
        onLeave: function(retval) {
            send ("canOpenURL returned: " + retval);
          }

    });

    // Intercept file existence checks via [NSFileManager fileExistsAtPath:]

    var fileExistsAtPath = ObjC.classes.NSFileManager["- fileExistsAtPath:"];
    var hideFile = 0;

    Interceptor.attach(fileExistsAtPath.implementation, {
        onEnter: function(args) {
          var path = ObjC.Object(args[2]);
          // send("[NSFileManager fileExistsAtPath:] " + path.toString());

          if (path.toString() == "/Applications/Cydia.app" || path.toString() == "/bin/bash") {
              hideFile = 1;
          }
        },
        onLeave: function(retval) {
            if (hideFile) {
                  send("Hiding jailbreak file...");MM
                retval.replace(0);
                hideFile = 0;
            }

            // send("fileExistsAtPath returned: " + retval);
      }
    });


    /* If the above doesn't work, you might want to hook low level file APIs as well

        var openat = Module.findExportByName("libsystem_c.dylib", "openat");
        var stat = Module.findExportByName("libsystem_c.dylib", "stat");
        var fopen = Module.findExportByName("libsystem_c.dylib", "fopen");
        var open = Module.findExportByName("libsystem_c.dylib", "open");
        var faccesset = Module.findExportByName("libsystem_kernel.dylib", "faccessat");

    */

""")

def on_message(message, data):
    if 'payload' in message:
              print(message['payload'])

script.on('message', on_message)
script.load()
sys.stdin.read()
File Integrity Checks
Overview
There are two file-integrity related topics:
The application-source related integrity checks: In the "Tampering and Reverse Engineering" chapter, we discussed iOS IPA application signature check. We also saw that determined reverse engineers can easily bypass this check by re-packaging and re-signing an app using a developer or enterprise certificate. One way to make this harder, is to add an internal runtime check in which you check whether the signatures still match at runtime.
The file storage related integrity checks: When files are stored by the application or key-value pars in the keychain,
UserDefaults/NSUserDefaults, a SQLite database or a Realm database, then their integrity should be protected.
Sample Implementation - application-source
Integrity checks are already taken care off by Apple using their DRM. However, there are additional controls possible, such as in the example below. Here the mach_header is parsed through to calculate the start of the instruction data and then use that to generate the signature. Now the signature is compared to the one given. Please make sure that the signature to be compared to is stored or coded somewhere else.
int xyz(char *dst) {
    const struct mach_header * header;
    Dl_info dlinfo;

    if (dladdr(xyz, &dlinfo) == 0 || dlinfo.dli_fbase == NULL) {
        NSLog(@" Error: Could not resolve symbol xyz");
        [NSThread exit];
    }

    while(1) {

        header = dlinfo.dli_fbase;  // Pointer on the Mach-O header
        struct load_command * cmd = (struct load_command *)(header + 1); // First load command
        // Now iterate through load command
        //to find __text section of __TEXT segment
        for (uint32_t i = 0; cmd != NULL && i < header->ncmds; i++) {
            if (cmd->cmd == LC_SEGMENT) {
                // __TEXT load command is a LC_SEGMENT load command
                struct segment_command * segment = (struct segment_command *)cmd;
                if (!strcmp(segment->segname, "__TEXT")) {
                    // Stop on __TEXT segment load command and go through sections
                    // to find __text section
                    struct section * section = (struct section *)(segment + 1);
                    for (uint32_t j = 0; section != NULL && j < segment->nsects; j++) {
                        if (!strcmp(section->sectname, "__text"))
                            break; //Stop on __text section load command
                        section = (struct section *)(section + 1);
                    }
                    // Get here the __text section address, the __text section size
                    // and the virtual memory address so we can calculate
                    // a pointer on the __text section
                    uint32_t * textSectionAddr = (uint32_t *)section->addr;
                    uint32_t textSectionSize = section->size;
                    uint32_t * vmaddr = segment->vmaddr;
                    char * textSectionPtr = (char *)((int)header + (int)textSectionAddr - (int)vmaddr);
                    // Calculate the signature of the data,
                    // store the result in a string
                    // and compare to the original one
                    unsigned char digest[CC_MD5_DIGEST_LENGTH];
                    CC_MD5(textSectionPtr, textSectionSize, digest);     // calculate the signature
                    for (int i = 0; i < sizeof(digest); i++)             // fill signature
                        sprintf(dst + (2 * i), "%02x", digest[i]);

                    // return strcmp(originalSignature, signature) == 0;    // verify signatures match

                    return 0;
                }
            }
            cmd = (struct load_command *)((uint8_t *)cmd + cmd->cmdsize);
        }
    }

}
Sample Implementation - Storage
When providing integrity on the application storage itself, you can either create an HMAC or a signature over a given key-value pair or over a file stored on the device. When you create an HMAC, it is best to use the CommonCrypto implementation. In case of the need for encryption: Please make sure that you encrypt and then HMAC as described in Authenticated Encryption.
When generating an HMAC with CC:
- get the data as
NSMutableData. - Get the data key (possibly from the keychain)
- Calculate the hash value
- Append the hash value to the actual data
- Store the results of step 4.
    // Allocate a buffer to hold the digest, and perform the digest.
    NSMutableData* actualData = [getData];
     //get the key from the keychain
    NSData* key = [getKey];
   NSMutableData* digestBuffer = [NSMutableData dataWithLength:CC_SHA256_DIGEST_LENGTH];
   CCHmac(kCCHmacAlgSHA256, [actualData bytes], (CC_LONG)[key length], [actualData
     bytes], (CC_LONG)[actualData length], [digestBuffer mutableBytes]);
   [actualData appendData: digestBuffer];
Alternatively you can use NSData for step 1 and 3, but then you need to create a new buffer in step 4.
When verifying the HMAC with CC:
- Extract the message and the hmacbytes as separate
NSData. - Repeat step 1-3 of generating an hmac on the
NSData. - Now compare the extracted hamcbytes to the result of step 1.
    NSData* hmac = [data subdataWithRange:NSMakeRange(data.length - CC_SHA256_DIGEST_LENGTH, CC_SHA256_DIGEST_LENGTH)];
    NSData* actualData = [data subdataWithRange:NSMakeRange(0, (data.length - hmac.length))];
    NSMutableData* digestBuffer = [NSMutableData dataWithLength:CC_SHA256_DIGEST_LENGTH];
    CCHmac(kCCHmacAlgSHA256, [actualData bytes], (CC_LONG)[key length], [actualData bytes], (CC_LONG)[actualData length], [digestBuffer mutableBytes]);
    return [hmac isEqual: digestBuffer];
Bypassing File Integrity Checks
When trying to bypass the application-source integrity checks
- Patch out the anti-debugging functionality. Disable the unwanted behavior by simply overwriting the respective code with NOP instructions.
- Patch any stored hash that is used to evaluate the integrity of the code.
- Use Frida to hook APIs to hook file system APIs. Return a handle to the original file instead of the modified file.
When trying to bypass the storage integrity checks
- Retrieve the data from the device, as described at the secion for device binding.
- Alter the data retrieved and then put it back in the storage
Effectiveness Assessment
For the application source integrity checks Run the app on the device in an unmodified state and make sure that everything works. Then apply patches to the executable using optool and re-sign the app as described in the chapter "Basic Security Testing" and run it. The app should detect the modification and respond in some way. At the very least, the app should alert the user and/or terminate the app. Work on bypassing the defenses and answer the following questions:
- Can the mechanisms be bypassed using trivial methods (e.g. hooking a single API function)?
- How difficult is it to identify the anti-debugging code using static and dynamic analysis?
- Did you need to write custom code to disable the defenses? How much time did you need to invest?
- What is your subjective assessment of difficulty?
For a more detailed assessment, apply the criteria listed under "Assessing Programmatic Defenses" in the "Assessing Software Protection Schemes" chapter.
For the storage integrity checks A similar approach holds here, but now answer the following questions:
- Can the mechanisms be bypassed using trivial methods (e.g. changing the contents of a file or a key-value)?
- How difficult is it to obtain the HMAC key or the asymmetric private key?
- Did you need to write custom code to disable the defenses? How much time did you need to invest?
- What is your subjective assessment of difficulty?
Device Binding
Overview
The goal of device binding is to impede an attacker when he tries to copy an app and its state from device A to device B and continue the execution of the app on device B. When device A has been deemed trusted, it might have more privileges than device B, which should not change when an app is copied from device A to device B.
Please note that since iOS 7.0 hardware identifiers, such as the MAC addresses are off-limits. The possible ways to bind an application to a device are based on using identifierForVendor, storing something in the keychain or using Google its InstanceID for iOS [2]. See Remediation for more details.
Static Analysis
When the source-code is available, then there are a few codes you can look for which are bad practices, such as:
- MAC addresses: there are various ways to find the MAC address: when using the
CTL_NET(network subystem), theNET_RT_IFLIST(getting the configured interfaces) or when the mac-address gets formatted, you often see formatting code for printing, in terms of"%x:%x:%x:%x:%x:%x". - using the UDID:
[[[UIDevice currentDevice] identifierForVendor] UUIDString];and in Swift3:UIDevice.current.identifierForVendor?.uuidString - Any keychain or filesystem based binding which are unprotected by any
SecAccessControlCreateFlagsor use protectionclasses such askSecAttrAccessibleAlwaysorkSecAttrAccessibleAlwaysThisDeviceOnly.
Dynamic Analysis
There are a few ways to test the application binding:
Dynamic Analysis using a simulator
Take the following steps when you want to verify app-binding at a simulator:
- Run the application on a simulator
- Make sure you can raise the trust in the instance of the application (e.g. authenticate)
- Retrieve the data from the Simulator This has a few steps:
- As simulators use UUIDs to identify themselves, you could make it easer to locate the storage by creating a debug point and on that point execute
po NSHomeDirectory(), which will reveal the location of where the simulator stores its contents. Otherwise you can do afind ~/Library/Developer/CoreSimulator/Devices/ | grep <appname>for the suspected plist file. - go to the directory printed with the given command
- copy all three folders found (Documents, Library, tmp)
- Copy the contents of the keychain, these can be found, since iOS 8, in
~/Library/Developer/CoreSimulator/Devices/<Simulator Device ID>/data/Library/Keychains.
- As simulators use UUIDs to identify themselves, you could make it easer to locate the storage by creating a debug point and on that point execute
- Start the application on another simulator & find its data location as described in step 3.
- Stop the application on the second simulator, now overwrite the existing data with the data copied in step 3.
- Can you continue in an authenticated state? If so, then binding might not be working properly.
Please note that we are saying that the binding "might" not be working as not everything is unique in simulators.
Dynamic Analysis using two jailbroken devices
Take the following steps when you want to verify app-binding by using two jailbroken devices:
- Run the app on your jailbroken device
- Make sure you can raise the trust in the instance of the application (e.g. authenticate)
- Retrieve the data from the jailbroken device:
- you can ssh to your device and then extract the data (just as with a similator, either use debugging or a
find /private/var/mobile/Containers/Data/Application/ |grep <name of app>. The directory is in/private/var/mobile/Containers/Data/Application/<Application uuid> - go to the directory printed with the given command using SSH or copy the folders in there using SCP (
scp <ipaddress>:/<folder_found_in_previous_step> targetfolder. You can use an FTP client like Filezilla as well. - retrieve the data from the keychain, which is stored
/private/var/Keychains/keychain-2.db, which you can retrieve using the keychain dumper. For that you first need to make it world readablechmod +r /private/var/Keychains/keychain-2.dband then execute./keychain_dumper -a
- you can ssh to your device and then extract the data (just as with a similator, either use debugging or a
- Install the application on the second jailbroken device.
- Overwrite the data of the application extracted from step 3. They keychain data will have to be manually added.
- Can you continue in an authenticated state? If so, then binding might not be working properly.
Remediation
Before we describe the usable identifiers, let's quickly discuss how they can be used for binding. There are three methods which allow for device binding in iOS:
- You can use
[[UIDevice currentDevice] identifierForVendor](in Objective-C) orUIDevice.current.identifierForVendor?.uuidString(in swift3) andUIDevice.currentDevice().identifierForVendor?.UUIDString(in swift2). Which might change upon reinstalling the application when no other applications from the same vendor are installed. - You can store something in the keychain to identify the application its instance. One needs to make sure that this data is not backed up by using
kSecAttrAccessibleWhenPasscodeSetThisDeviceOnly(if you want to secure it and properly enforce having a passcode or touch-id) or by usingkSecAttrAccessibleAfterFirstUnlockThisDeviceOnly, orkSecAttrAccessibleWhenUnlockedThisDeviceOnly. - You can use Google and its instanceID for iOS.
Any scheme based on these variants will be more secure the moment passcode and/or touch-id has been enabled and the materials stored in the Keychain or filesystem have been protected with protectionclasses such as kSecAttrAccessibleAfterFirstUnlockThisDeviceOnly and kSecAttrAccessibleWhenUnlockedThisDeviceOnly and the SecAccessControlCreateFlags is set with kSecAccessControlDevicePasscode (for passcodes), kSecAccessControlUserPresence (passcode or touchid), kSecAccessControlTouchIDAny (touchID), kSecAccessControlTouchIDCurrentSet (touchID: but current fingerprints only).
References
OWASP Mobile Top 10 2016
- M9 - Reverse Engineering - https://www.owasp.org/index.php/Mobile_Top_10_2016-M9-Reverse_Engineering
OWASP MASVS
- V8.1: "The app detects, and responds to, the presence of a rooted or jailbroken device either by alerting the user or terminating the app."
- V8.9: "All executable files and libraries belonging to the app are either encrypted on the file level and/or important code and data segments inside the executables are encrypted or packed. Trivial static analysis does not reveal important code or data."
- V8.10: "Obfuscation is applied to programmatic defenses, which in turn impede de-obfuscation via dynamic analysis."
- V8.11: "The app implements a 'device binding' functionality using a device fingerprint derived from multiple properties unique to the device."
- V8.13: "If the goal of obfuscation is to protect sensitive computations, an obfuscation scheme is used that is both appropriate for the particular task and robust against manual and automated de-obfuscation methods, considering currently published research. The effectiveness of the obfuscation scheme must be verified through manual testing. Note that hardware-based isolation features are preferred over obfuscation whenever possible."
Tools
- Frida - http://frida.re/
- Keychain Dumper - https://github.com/ptoomey3/Keychain-Dumper
- Appsync Unified - https://cydia.angelxwind.net/?page/net.angelxwind.appsyncunified